My friend Sara turned 35 in August. She had not had a birthday party for herself in YEARS. So I conspired with our mutual friend Sarah to throw Sara a Surprise Party! And we LOVE theme parties. We threw her a 60's/tie dye theme party. And what better way to make a party a success than with an AWESOME cake. Behold... The Tie Dye Cake! Many people have requested the recipe on how I created this awesome cake. I can't take full credit as I did Google it and got some hits and some great ideas. But below is my recipe and instructions for "Sara's Tie Dye Ice Cream cake"!
First of all you need:
Lots of food coloring
Spring form pans
lots of bowls/spoons
Wax paper
White cake mixes
patience and time. Cake has to set up overnight!
Step 1: Preheat your oven to the temperature on the cake mixes. Grab your white cake mixes. It is up to you on how many to use. I was making LOTS of cake so I used 3 mixes. I needed enough for 3 layers but I overestimated how much I needed (I will explain later how I handled this problem). You be the judge. The amount of cake mix you make does not effect the tie dye effect. You just need enough pans to bake the cake mix. So back to step 1.... mix up your white cake mixes exactly as the recipe on the box states.
Step 2: Figure out how many colors you want to make. I went with 6 colors. I took out 6 small bowls and 6 spoons to mix with. I split the mixed cake mix equally between the 6 small bowls. Then I added the color to each of the bowls and mixed the colors up. I used the gel food coloring you buy in the baking section of the grocery store. I used 2 boxed of the food coloring.
Yellow (upper left corner) and green are mixed already. The other bowls of cake mix are waiting for colors.

Don't be shy with the food coloring. Having bright and vibrant colored mix makes the cake look awesome once it bakes! I use a whole tube of food coloring for the red cake mix. I did not want it to look pink.

I made purple by using red and blue food coloring. It turned out almost black in the bowl but it looks purple once the cake is baked.

All 6 of my colors. (I used yellow and red to make the orange)

Step 3: Prepare your pans. I used 2 spring form pans and one small regular cake pan. I wanted a 3 layer cake with 3 different size layers. I sprayed some "Bakers Joy" spray on my pans to prevent the cake from sticking.

Step 4: Starting with your darkest color pour 1/3 (or 1/2 if you are only using 2 pans) of your purple into the center of the pan. Add your next color, green in my case to the center of the purple. Then Blue, then orange, then yellow and lastly red. As the colors land on each other they push the darker/previous color out towards the edge of the pan. Repeat this step to fill all of your cake pans.
Here is what 2 of my cake pans looked like when I was done.


Optional Step.... You could reverse the colors on the second pan. So you pour red, then yellow, then orange, then blue , then green and last purple so that when you put the layers together in the finished cake and ice it it is opposite. It might make for a funner reveal when the cake is cut and eaten!
Tower of dishes!

Cake pans ready to put in the oven!

Step 5: Bake your cakes. While they are baking do your dishes and clean your counters so your cakes have a place to cool once they are done. (can you tell I am a clean freak?!?!)
Here is a picture of my 3 cakes about 1/2 way through the baking time. The colors are melding into each other! So cool looking!

I used 3 different size pans so I had to watch my cakes carefully to take the smaller ones out as they got done. I just put a knife in until it came out clean. The cakes baked exactly like they would have without the food coloring. It tastes the same too!
The baked cakes cooling. Make sure you cool the cake completely!

Optional Step: I way overestimated how much cake I needed. So when I pulled the cakes out I realized that they were way to tall for me to add ice cream onto as well. So I just grabbed my long serrated knife and cut the cakes in half as seen below.

Then because I did not need that much cake for the party I double wrapped the layers and froze them for a latter date. (which reminds me.... I should pull those out and eat them this week!) As seen below:

Optional end step: At this point you could just ice your cakes with your favorite frosting and watch with a smirk on your face as the guest of honor cuts into the plain white cake to discover a wild pattern of colors inside. Or if you are an over achiever like me you can ....
Add ICE CREAM!!!!!
Step 6: About 15 minutes before you prepare to make your tie dye ice cream cake, place your ice cream of choice on the counter to thaw. You need the ice cream to be soft enough to spread.
Step 7: Prepare your pans and cakes. I put wax paper on the bottom of the spring form pans and lined the smaller cake pan as well. Then I snapped the spring form pans back together. Next place your cooled cakes back in the pans.

Step 8: Place your now thawed ice cream into a bowl. Using a wooden/sturdy spoon stir the ice cream until it is soft enough to spread on your cake.

I used chocolate on the bottom layer and then cookies and cream on the top layers. For my cake I used a 1/2 gallon on the bottom layer and then split the 1/2 gallon on the other 2 layers.

Spread the ice cream across the top of the cake until it is covered and smooth.

Step 9: After your ice cream is spread then cover the cake with wax paper making sure no air is between the wax paper and the ice cream. No air will prevent ice cream from getting "freezer burn" in the freezer.

Step 10: Cover the whole cake pan with tin foil to prevent freezer burn. Place the cake(s) in the freezer at least overnight, or you could leave them longer as long as great care is taken to prevent freezer burn.
3 layers ready to go into the freezer!

Step 11: I don't have pictures of this step because I was doing it right before the party and did not have my camera handy. I will do my best to describe how to do it! I frosted my cake with Cool Whip. You could probably use actual frosting, too. I made sure the Cool Whip was spreadable, then I pulled the bottom layer out of the freezer. You have to work quickly because the ice cream will start to melt. I opened the spring form up and pulled all the wrapping off and placed the frozen layer on a cake platter. Then I quickly spread the cool whip all over the cake. Then I got the next layer out of the freezer, unwrapped it, and placed it on top of the first layer. I used some long skewers to push through the layers to prevent them from sliding since the ice cream was starting to melt. Then I added cool whip to that layer. And then repeated those steps with the top layer. Then I quickly put the whole thing (uncovered) back in the freezer to set up again.
To decorate my cake I had purchased some birthday candles that were on tooth picks because I wasn't sure if real candles would go through the ice cream layer. My candles spelled "Happy Birthday". I actually stood in front of the freezer and decorated the cake while it was still chilling! We did not light the candles because we knew that would just make the cake melt faster!

I had told Sara it was an "ice cream cake" but she had no idea it was a tie dye cake until she cut into it! It was so fun to see the expressions on people's faces when they saw how cool it looked! It really was awesome and fit the theme to a T!


Yummmy!
The only thing I think I will do different next time is make the ice cream layers thicker. The top layer of cake only has about 1/4 to 1/2 inch of ice cream on it. It would have been nicer to have a bigger layer of ice cream since it was such a hot day!
Anyway I hope you enjoy making this cake or at least seeing the process of how I made it for Sara!

 Step 2: Then you set up the area to actually make the balls. You will need a small bowl of butter to put on your hand to form the balls. You will need a place to put the balls after they are formed. I use a cookie sheet covered in wax paper.
 Step 3: Make the sauce. Combine 1 cup sugar, 1 cup light corn syrup in a sauce pan. Bring the mixture to a boil while stirring constantly to avoid scorching.
  After boiling for a minute then add a sm package of jello mix. Jasmyn helped with this step!
 Stir the jello mix into the boiling sugar and mix thoroughly. Bring to a complete boil.
 Step 4: Pour the sugar mixture over the popcorn.
  Then mix the popcorn and jello together. The sauce is HOT so be careful.
 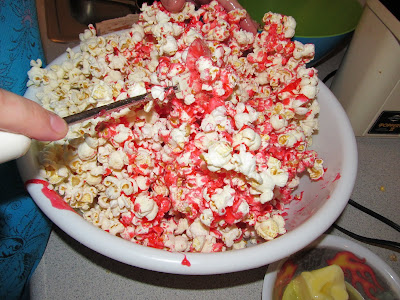 Step 5: Butter your hands. This will keep the sugar from sticking to your hands and burning you. It will also keep the popcorn balls from sticking to your hands.
  Then press the popcorn into balls. Press hard to help them keep there shape.
 This recipe makes about 12 balls.
 Mason on a popcorn ball sugar high!
 Kaleb enjoying the spoils!
 Step 2: Then you set up the area to actually make the balls. You will need a small bowl of butter to put on your hand to form the balls. You will need a place to put the balls after they are formed. I use a cookie sheet covered in wax paper.
 Step 3: Make the sauce. Combine 1 cup sugar, 1 cup light corn syrup in a sauce pan. Bring the mixture to a boil while stirring constantly to avoid scorching.
  After boiling for a minute then add a sm package of jello mix. Jasmyn helped with this step!
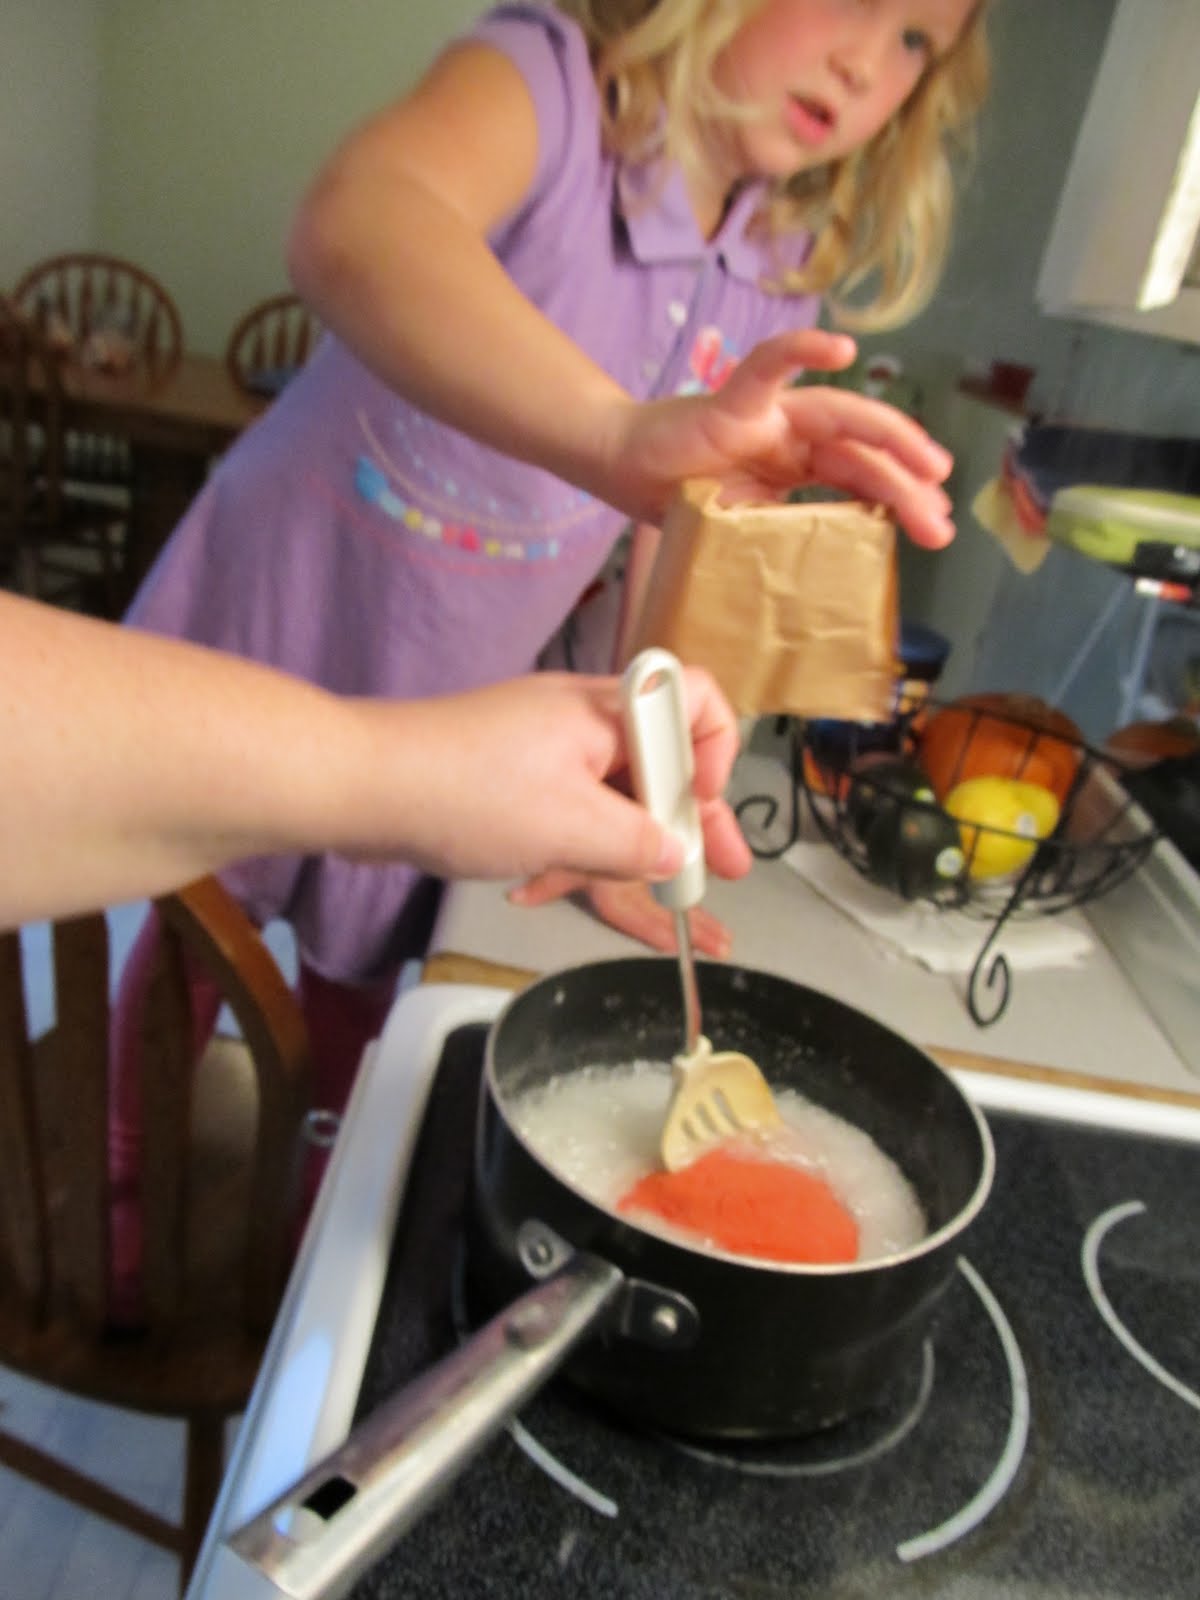 Stir the jello mix into the boiling sugar and mix thoroughly. Bring to a complete boil.
 Step 4: Pour the sugar mixture over the popcorn.
  Then mix the popcorn and jello together. The sauce is HOT so be careful.
  Step 5: Butter your hands. This will keep the sugar from sticking to your hands and burning you. It will also keep the popcorn balls from sticking to your hands.
 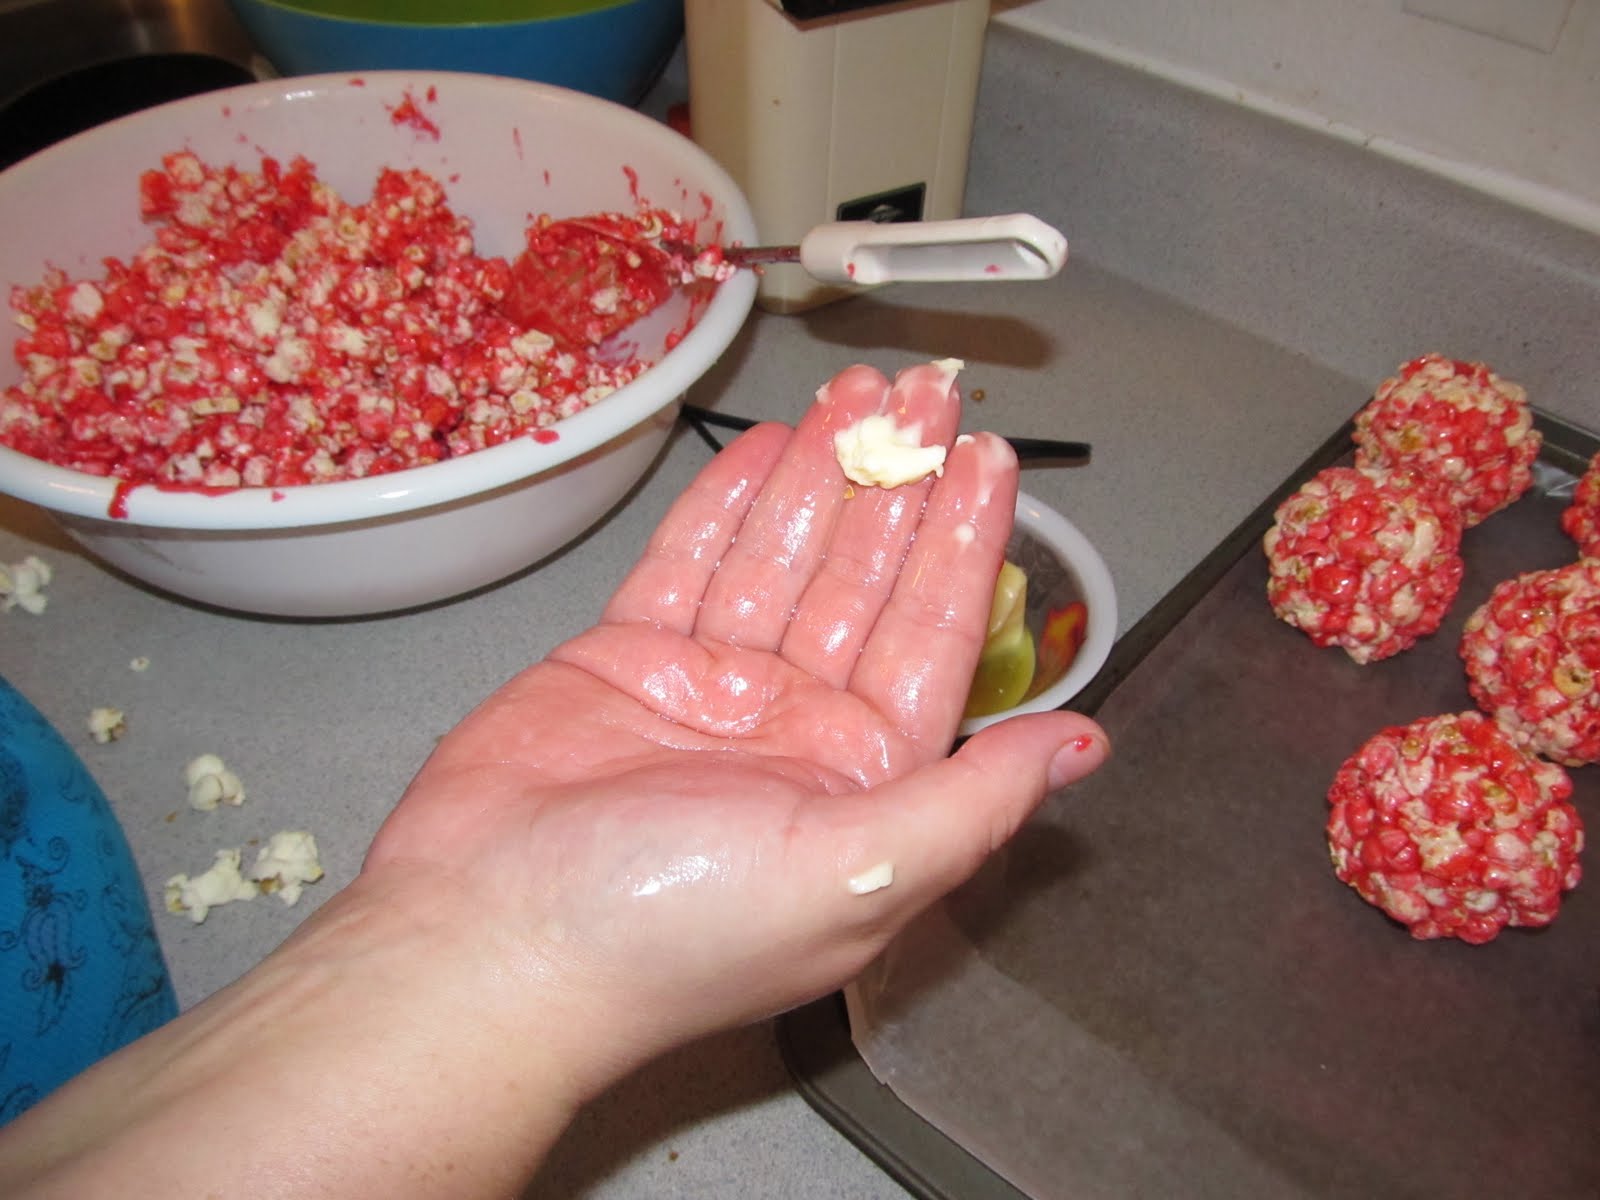 Then press the popcorn into balls. Press hard to help them keep there shape.
 This recipe makes about 12 balls.
 Mason on a popcorn ball sugar high!
 Kaleb enjoying the spoils!


